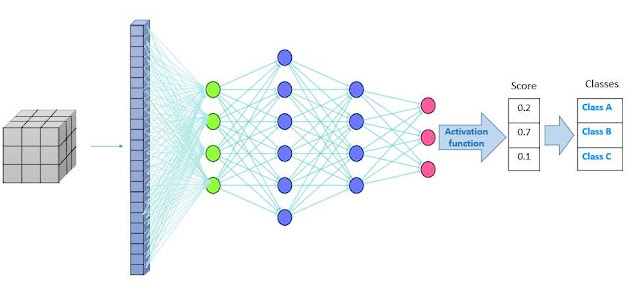
Deep neural networks are artificial intelligence systems that excite the brain. A complex graph is used to model it, and it has at least three layers: input layer, hidden layer, and output layer. The input layer correlates to the input data's properties, while the output layer reflects the task's outcomes. Deep neuron networks come in a variety of shapes and sizes, with the Convolution Neuron Network (CNN or ConvNet) being the most suitable for image analysis.
The convolution neural network (CNN) is a deep learning architecture that extracts semantic information from input data, and it represents a significant leap in computer vision. The machine can now execute visual analysis like a human owing to this architecture. The system can now recognize things in a photo or video. Object detection, face recognition, segmentation, and classification have all been made possible thanks to the combination of computer vision and deep learning.
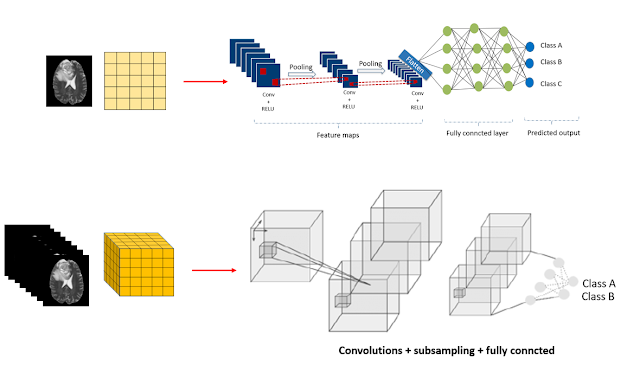
3D convolution neural network
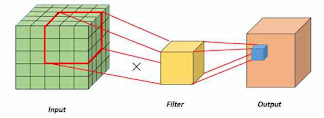
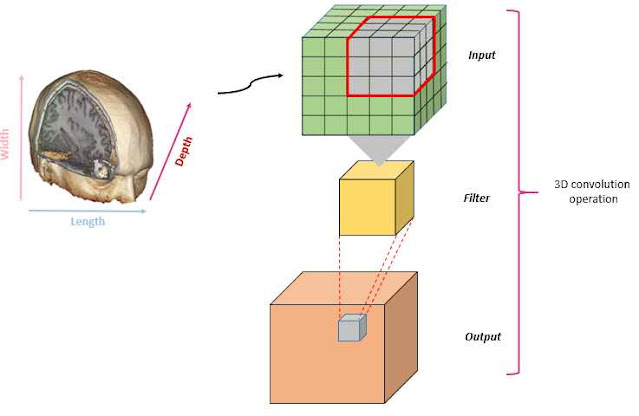
A 3D convolution neural network is a convolution neural network that can deal with 3D input data. Its structure is identical to 2D CNN, but it takes more memory space and run time than 2D CNN due to 3D convolutions. On the other hand, it can give precise results as 2D CNN thanks to the rich input data.
Note: CNN architectures include resnet, LeNet, and Densenet, among others. These architectures are also available in three-dimensional form.
3D Convolution layer :
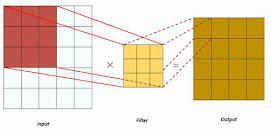
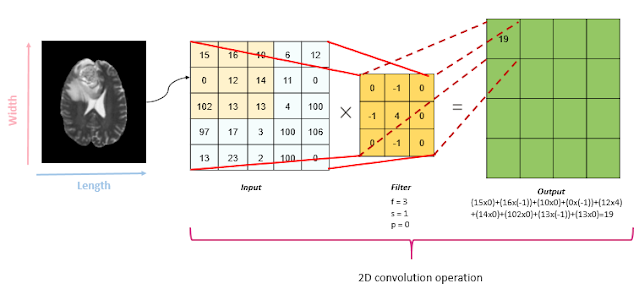
The convolution result is calculated according to a filter (f), Padding (p), and Stride (s).
- The filter: the filter is used to analyze the image area by area.
- The padding represents the pixels (of zero value) to add around the image in order to avoid the loss of information.
- The stride parameter indicates the number of pixels to leap in each step to proceed in the convolution process. To know more click here!
3D Pooling layer :
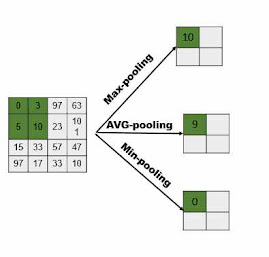 |
| 2D pooling operation |

Code :
3D Fully connected layer
Code :
 import torch.nn as nn
import torch.nn.functional as F

fullyC1 = nn.Linear(INsize, OUTsize)
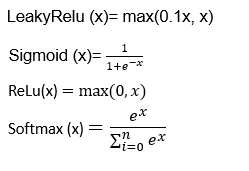
Activation functions
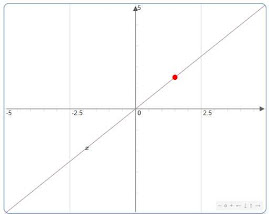
Linear activation functions
Non-linear activation functions
Code:
 import torch.nn as nn
import torch.nn.functional as F

conv_Pool_layer = nn.Sequential(
nn.Conv3d(in_val, out_val, kernel_size=(3, 3, 3), padding=0),
nn.LeakyReLU(),
nn.MaxPool3d((2, 2, 2))
A simple comparison of 3D CNN with 2D CNN for image classification of brain tumors
import torch.nn as nn
#LeakyReLU activation function
AF_LeakyReLU = nn.LeakyReLU()

#Sigmoid activation function
AF_Sigmoid = nn.Sigmoid()

#Softmax activation function
AF_Softmax = nn.Softmax()

#ReLU activation function
AF_ReLU = nn.ReLU()Most popular frameworks
Pytorch
Keras
Keras is an open-source library that is specialized in neural network tasks. It is built on multiple platforms, including TensorFlow, Theano, Toolkit.
The Keras library was created by François Chollet in 2015. It is easy to use and is characterized by its low speed.
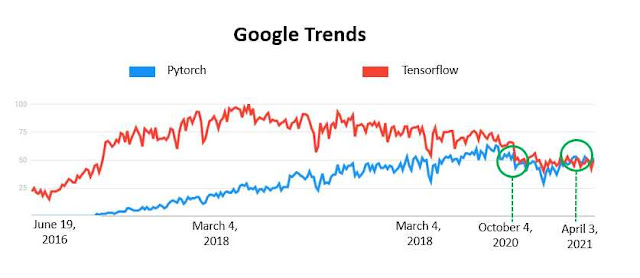
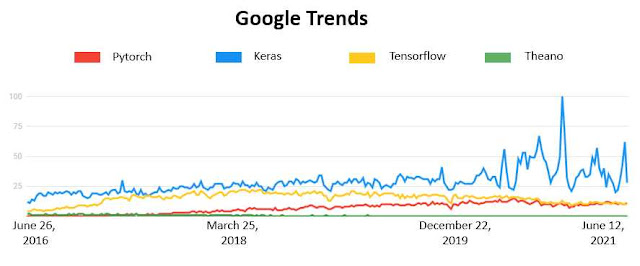
According to statistics from Google Trends, Keras has retained the first place as the most searched framework on Google since 2016.
Use Case
1) Install PyTorch
2) Dataset
3) Implementation
3.1) Read Data
In the path variable, you should write the path to the dataset folder.
Code :
import h5py
path_dir="write here the path to the dataset folder"
with h5py.File(path_dir+"full_dataset_vectors.h5", "r") as data:
    X_train = data["X_train"][:]
    y_train = data["y_train"][:]
    X_test = data["X_test"][:]
    y_test = data["y_test"][:]
Let's have a look at the data types in the 3D Mnist dataset.
Code :
print('X_train   :   shape:', X_train.shape, '         type:', type(X_train))
print('y_train   :   shape:', y_train.shape, '              type:', type(y_train))
print('X_test    :   shape:', X_test.shape, '          type:', type(X_test))
print('y_test    :   shape:', y_test.shape, '               type:', type(y_test))
3.2) Reshape data
MNIST images in 3D space are 16x16x16 size. We resize each image vector to 16x16x16, as shown below.
Code :
 import torch
def transform_images_dataset (data):
    #Binarize_images_dataset
    th=0.2
    upper=1
    lower=0
    data = np.where(data>th, upper, lower)
    #data_transform_channels
    data = data.reshape(data.shape[0], 1, 16,16,16)
    data = np.stack((data,) * 3, axis=-1) #
    return(torch.as_tensor(data))
X_train = transform_images_dataset(X_train)
X_test = transform_images_dataset(X_test)

def one_hit_data (target):
    # Convert to torch Tensor
    target_tensor = torch.as_tensor(target)
    # Create one-hot encodings of labels
    one_hot = torch.nn.functional.one_hot(target_tensor, num_classes=10)
    return(one_hot)

y_train= one_hit_data (y_train)
y_test= one_hit_data (y_test)
print('X_train   :   shape:', X_train.shape, '          type:', type(X_train))
print('y_train   :   shape:', y_train.shape, '                     type:', type(y_train))
print('X_test    :   shape:', X_test.shape, '           type:', type(X_test))
print('y_test    :   shape:', y_test.shape, '                      type:', type(y_test))
torch.nn.functional.one_hotWe'll begin building our model after we've prepared the data.
Step1: import libraries
Code :
 import pandas as pd
import numpy as np
from tqdm.auto import tqdm
import os
import matplotlib.pyplot as plt
import torch
from torch.autograd import Variable
import torch.nn as nn
import torch.nn.functional as F
from torch.optim import *
from sklearn.metrics import confusion_matrix
from sklearn.metrics import ConfusionMatrixDisplay
import seaborn as sns
Step2: Create a 3D convolutional neural network model for image classification
Code :
 class CNN_classification_model (nn.Module):
    def __init__(self):
        super(CNN_classification_model, self).__init__()
        self.model= nn.Sequential(

        #Conv layer 1
        nn.Conv3d(3, 32, kernel_size=(3, 3, 3), padding=0),
        nn.ReLU(),
        nn.MaxPool3d((2, 2, 2)),

        #Conv layer 2
        nn.Conv3d(32, 64, kernel_size=(3, 3, 3), padding=0),
        nn.ReLU(),
        nn.MaxPool3d((2, 2, 2)),

        #Flatten
        nn.Flatten(),
        #Linear 1
        nn.Linear(2**3*64, 128),
        #Relu
        nn.ReLU(),
        #BatchNorm1d
        nn.BatchNorm1d(128),
        #Dropout
        nn.Dropout(p=0.15),
        #Linear 2
        nn.Linear(128, num_classes)
        )


    def forward(self, x):
        # Set 1
        out = self.model(x)
        return out
Code :
 def accuracyFUNCTION (predicted, targets):
    c=0
    for i in range(len(targets)):
        if (predicted[i] == targets[i]):
            c+=1
    accuracy =  c / float(len(targets))
    print('accuracy   = ', c ,'/', len(targets))
    return(accuracy)
Code:
 batch_size = 100
 # Pytorch train and test sets
 train = torch.utils.data.TensorDataset(X_train.float(),y_train.long())
 test = torch.utils.data.TensorDataset(X_test.float(),y_test.long())
 # data loader with pytorch
 train_loader = torch.utils.data.DataLoader(train, batch_size = batch_size, shuffle = False)
 test_loader = torch.utils.data.DataLoader(test, batch_size = batch_size, shuffle = False)
 # we have 10 classes
 num_classes = 10
# The number of epochs (here the number of iterations is = 5000 / we have 50 epochs a batch size is 100 / 50*100=5000)
num_epochs = 50
 # 3D model
 model = CNN_classification_model()
 #You can use the GPU by typing: model.cuda()
 print(model)
 # Loss function : Cross Entropy
 error = nn.CrossEntropyLoss()
 # Learning rate : learning_r = 0.01
 learning_r = 0.01
 # SGD optimizer
optimizer = torch.optim.SGD(model.parameters(), lr=learning_r)
#***********************************************************************training***********************************
itr = 0
loss_list = []
iteration_list = []
accuracy_list = []
for epoch in range(num_epochs):
for i, (images, labels) in tqdm(enumerate(train_loader)):
train = Variable(images.view(100,3,16,16,16))
labels = Variable(labels)
# zero_grad : Clear gradients
optimizer.zero_grad()
# Forward propagation / CNN_classification_model
outputs = model(train)
# Calculate loss value / using cross entropy function
labels= labels.argmax(-1)
loss = error(outputs, labels)
loss.backward()
# Update parameters using SGD optimizer
optimizer.step()
#calculate the accuracy using test data
itr += 1
if itr % 50 == 0:
# Prepare a list of correct results and a list of anticipated results.
listLabels=[]
listpredicted=[]
# test_loader
for images, labels in test_loader:
test = Variable(images.view(100,3,16,16,16))
# Forward propagation
outputs = model(test)
# Get predictions from the maximum value
predicted = torch.max(outputs.data, 1)[1]
# used to convert the output to binary variables
predicted= one_hit_data (predicted)
# Create a list of predicted data
predlist=[]
for i in range(len(predicted)):
p = int(torch.argmax(predicted[i]))
predlist.append(p)
listLabels+=(labels.argmax(-1).tolist())
listpredicted+=(predlist)
# calculate Accuracy
accuracy= accuracyFUNCTION(listpredicted, listLabels)
print('Iteration: {} Loss: {} Accuracy: {} %'.format(itr, loss.data, accuracy))
# store loss and accuracy. They'll be required to print the curve.
loss_list.append(loss.data)
accuracy_list.append(accuracy)
Step4: Display the accuracy curveCode :
 sns.set()
sns.set(rc={'figure.figsize':(12,7)}, font_scale=1)
plt.plot(accuracy_list,'b')
plt.plot(loss_list,'r')

plt.rcParams['figure.figsize'] = (7, 4)
plt.xlabel("Epochs")
plt.ylabel("Accuracy")
plt.title("Training step:  Accuracy vs Loss ")
plt.legend(['Accuracy','Loss'])
plt.show()
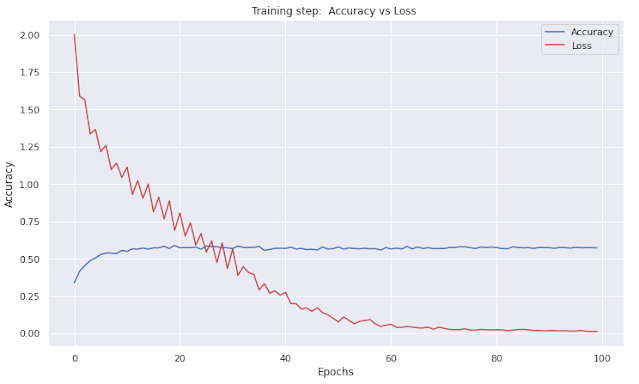
Step 5: Display the confusion matrix
Code :
 predictionlist=[]
for i in range(len(outputs)):
    p = int(torch.argmax(outputs[i]))
    predictionlist.append(p)
labels1=labels.argmax(-1).tolist()
labels1= [str(x) for x in labels1]
predictionlist= [str(x) for x in predictionlist]
labelsLIST = ['0','1', '2','3', '4','5', '6','7', '8','9']
cm = confusion_matrix(labels1, predictionlist, labels=labelsLIST)
ConfusionMatrixDisplay(cm).plot()
#   ******************** color of confusion matrix


ax= plt.subplot()
sns.heatmap(cm, annot=True, ax = ax, cmap=plt.cm.Blues); #annot=True to annotate cells

# labels, title and ticks
ax.set_xlabel('Predicted labels');ax.set_ylabel('True labels')
ax.set_title('Confusion Matrix');
ax.xaxis.set_ticklabels( ['0','1', '2','3', '4','5', '6','7', '8','9']); ax.yaxis.set_ticklabels(['0','1', '2','3', '4','5', '6','7', '8','9'])
plt.rcParams['figure.figsize'] = (8, 7)
plt.show()
Conclusion
- 3D CNN follows the same principle as 2D CNN.
- 3D CNN uses 3D convolution layers to analyze three-dimensional images, allowing for a more sophisticated computing process (a lot of memory space and execution time).
- Because 3D pictures contain more detail than 2D images, CNN 3D is more prone to overfitting.

